Vector Images
Vector images are graphical pictures of geometric shapes like dots, lines, rectangles, circles, ellipses and curves. Vector images need much less space to be stored then raster images.
Creating Vector Images
Tools for vector images creation are listed below.
| Button | Function | Description |
|---|---|---|
| Line |
Draw a straight line of any length. |
|
| Rectangle |
Use to draw rectangles and squares of any size. |
|
| Ellipse |
Draw ellipses and circles of different sizes. |
|
| Pencil |
Allows to draw custom lines and curves. |
To draw a vector image, choose the corresponding tool in the Insert menu or press the required button on the toolbar. Left click a spot in the workspace to set coordinates for the first object node and drag the cursor in the required direction and distance while holding the left mouse button.
Copying and Pasting Vector Images
Vector images are copied and pasted in Master PDF Editor same way as any other objects in Master PDF Editor.
To copy a vector image choose the Edit Document ![]() tool. Select the required vector image with left click and choose the Copy (Ctrl+C) item in the Edit menu or right-click the image and choose the Copy command in the context menu. The copied vector image will be stored in the clipboard. It later can be pasted into this or any other Master PDF Editor document.
tool. Select the required vector image with left click and choose the Copy (Ctrl+C) item in the Edit menu or right-click the image and choose the Copy command in the context menu. The copied vector image will be stored in the clipboard. It later can be pasted into this or any other Master PDF Editor document.
To paste a vector image into Master PDF Editor choose the Paste (Ctrl+V) item in the Edit menu or press the Paste ![]() button on the toolbar. You can also right-click the document page and choose the same command in the context menu. If you paste the vector image onto the current page, it will be initially located above the original image copied to the clipboard. If you paste vector image on another page (or another Master PDF Editor document), it will have same coordinates as the original one. You can move the image then to any new location.
button on the toolbar. You can also right-click the document page and choose the same command in the context menu. If you paste the vector image onto the current page, it will be initially located above the original image copied to the clipboard. If you paste vector image on another page (or another Master PDF Editor document), it will have same coordinates as the original one. You can move the image then to any new location.
The copied vector image can also be pasted to all document pages or specified pages range. To do it, use the Edit menu and choose Paste to Multiple Pages.
![]() A vector image can only be pasted into Master PDF Editor. It can’t be pasted into a document of any other application.
A vector image can only be pasted into Master PDF Editor. It can’t be pasted into a document of any other application.
Modifying Vector Images
To align vector images, choose the required alignment in the Edit > Align Objects menu out of the available options: align by left edge, right edge, top or bottom edge. Otherwise you can press required button on the toolbar: ![]() Align Left,
Align Left, ![]() Align Right,
Align Right, ![]() Align Top,
Align Top, ![]() Align Bottom, Align Center Vertically
Align Bottom, Align Center Vertically ![]() , Align Center Horizontally
, Align Center Horizontally ![]() .
.
Example: You need to align several vector images by top edge.
Enter edit mode by clicking the ![]() Edit Document or
Edit Document or ![]() Edit Vector Images button on the toolbar (or choose one of these items in the Tools menu). Select the required vector images. Alignment works by the top edge of the last selected (active) vector image. Object Inspector will display parameters for the active vector image. If you selected a group of vector images at once, there won’t be an active vector image, and the selected ones will be aligned by the top edge of the page.
Edit Vector Images button on the toolbar (or choose one of these items in the Tools menu). Select the required vector images. Alignment works by the top edge of the last selected (active) vector image. Object Inspector will display parameters for the active vector image. If you selected a group of vector images at once, there won’t be an active vector image, and the selected ones will be aligned by the top edge of the page.
When modifying vector images, 4 tabs are available in Object Inspector: Geometry, Style, Matrix and Clipping Path.

![]() Geometry tab displays settings for active vector image. If a group of vector images was selected with selection box, there won’t be an active vector image and Object Inspector won’t display settings.
Geometry tab displays settings for active vector image. If a group of vector images was selected with selection box, there won’t be an active vector image and Object Inspector won’t display settings.
- Width and height — these items of Geometry tab allow to specify size of vector image. To do it, select required image and specify the data in corresponding items.
- Left — distance from left page border to the left border of the vector image.
- Top — distance from top page border to the top border of the vector image.
- Coordinates — sets offset when aligning vector images with settings in left and top items. Coordinates can be absolute or relative.
- Relative — when aligning forms using top and/or left items distance between vector images remains same.
- Absolute — when aligning all vector images will be moved irregularly and will be positioned in coordinate point set in top and/or left items.
- Maintain aspect ratio — if enabled, vector image’s aspect ratio isn’t changed when its height and width are being modified.
- Rotate – allows to rotate vector image.
![]() Please note, that clipping path (if current vector image has one) won’t be rotated. It should be removed. To do it, go to Clipping Path tab of Object Inspector and click Remove button.
Please note, that clipping path (if current vector image has one) won’t be rotated. It should be removed. To do it, go to Clipping Path tab of Object Inspector and click Remove button.
Style tab
- Type — vector image type. Options: fill, stroke, fill and stroke. (It is not always possible to set this item. Some images have only one type – stroke.)
Depending on chosen image type, fill and stroke parameters can be set:
- Fill — vector image fill.
- Color — color of vector image fill. To choose custom color, press More… item in the end of the list.
- Opacity — opacity of fill in percents.
- Stroke — vector image stroke.
- Color — color of vector image stroke line. To choose custom color, press More… item in the end of the list.
- Opacity — opacity of stroke in percents.
- Line Thickness — thickness of stroke line. Can be set with 1 pixel step.
Matrix tab.
Transformation matrix serves for vector images transformation. More detailed information can be found in Transformation Matrix
Clipping Path tab.
Information about this tab can be found in Clipping Path
![]() When creating new vector image, options of last changed vector image will be used.
When creating new vector image, options of last changed vector image will be used.
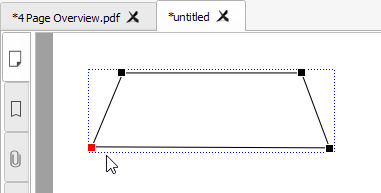
Editing vector image anchor points
After inserting a vector image to the page, you can edit its anchor points to adjust the shape to something more suitable for you.
To do this, select the ![]() Edit Document or
Edit Document or ![]() Edit Vector Images button on the toolbar and double-click the vector image. This will turn on the anchor point editing mode. Use the mouse to drag points how you feel appropriate. When you are done, press Esc.
Edit Vector Images button on the toolbar and double-click the vector image. This will turn on the anchor point editing mode. Use the mouse to drag points how you feel appropriate. When you are done, press Esc.
More like this:
Editing Objects in the PDF Document