PDF Document Printing
You can print the document only if your computer is connected to a local or network printer, and it has required drivers installed.
- Choose File > Print item in Main menu or press
 Print (Ctrl+P) button on the toolbar.
 - Choose one of the available devices for printing in following pop up window.
- Specify pages to print: all, current page, selected pages or pages range.
- Specify number of document copies.
- Press Print.
Master PDF Editor allows setting printing PDF with additional settings.
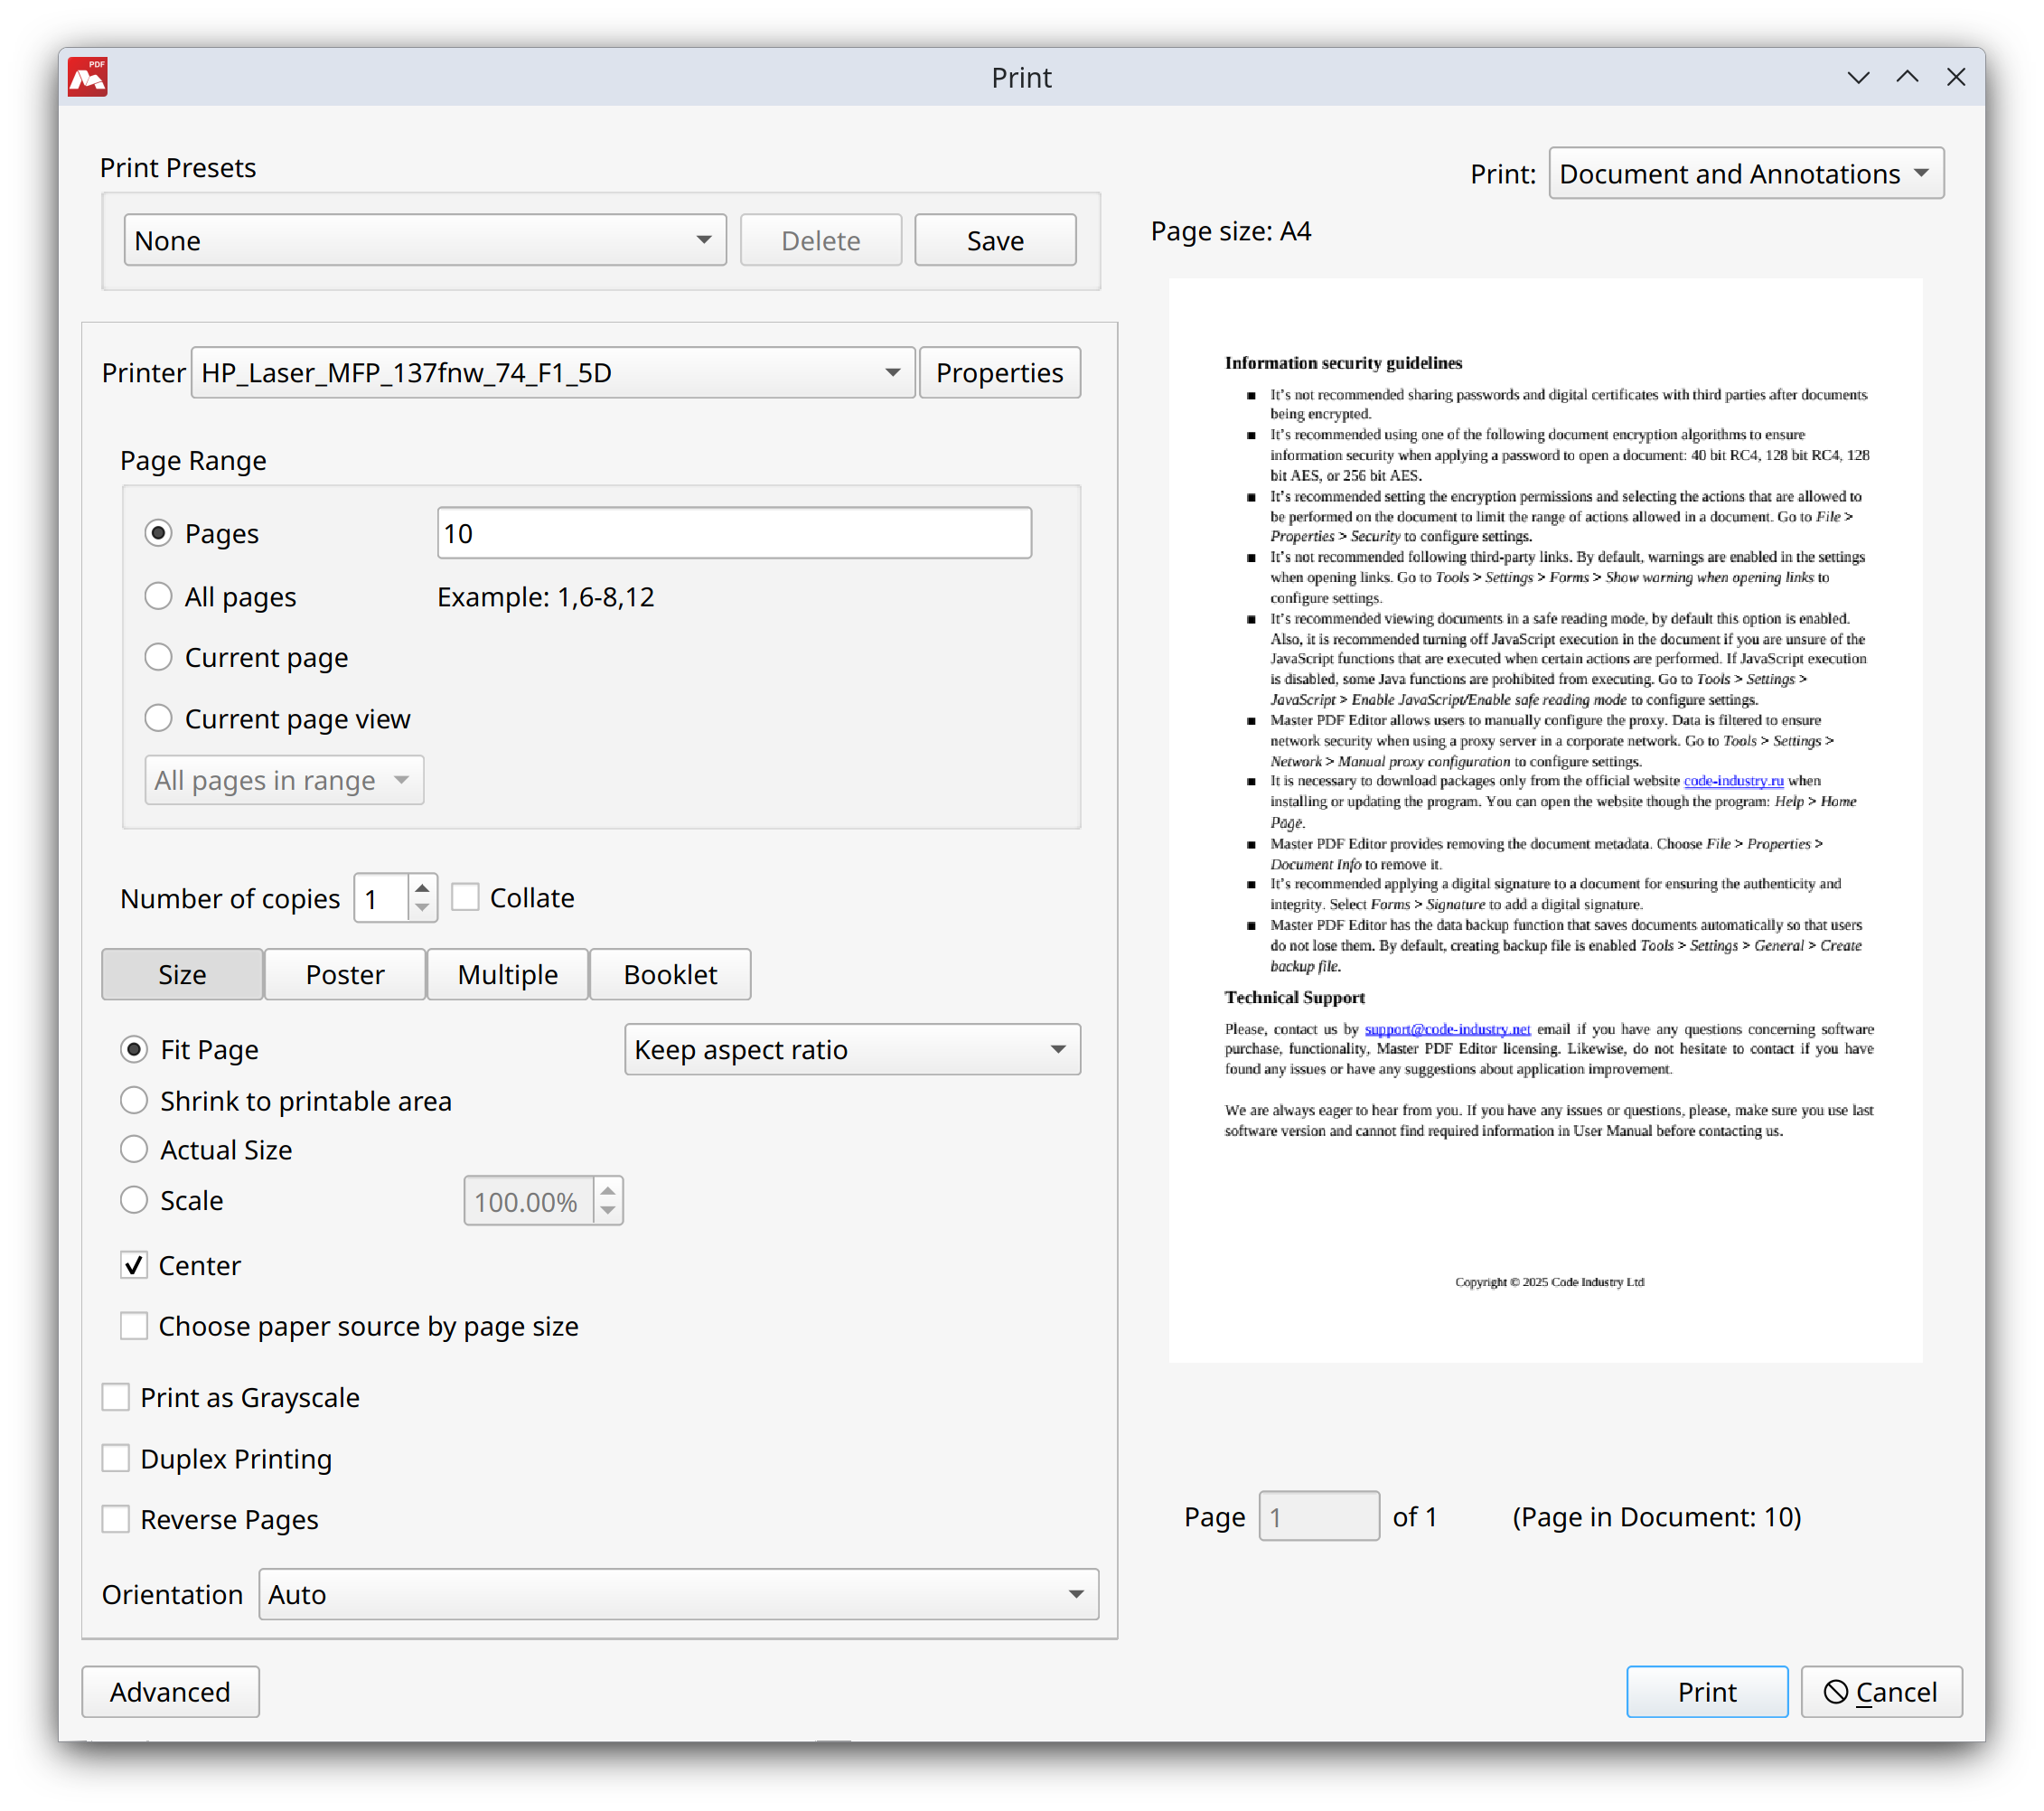
- Print Presets. Save print settings to choose them for the next printing.
- Printer. The name of the printer used for printing. Specify the paper size, as well as the orientation (portrait, landscape) and page margins.
- Page Range. Select all pages, current page, current page view, or set custom range of pages.
- Number of copies. Select the number of copies to be printed. The Collate option allows keeping pages in order when printing multiple copies.
- Choose paper source by paper size. Use the PDF page size to set parameters of the printer tray. This option is useful when printing PDF files with mixed-size pages using printers which have different-sized trays.
- Print as Grayscale. Enable if the document contains a variety of different colors and the printer only prints in black & white.
- Duplex Printing. Enable printing on both sides of the paper.
- Auto. Print documents in automatic mode if the printer supports the corresponding function. The device will automatically pull the pages back in and print on the other side. The binding method will depend on the printer settings.
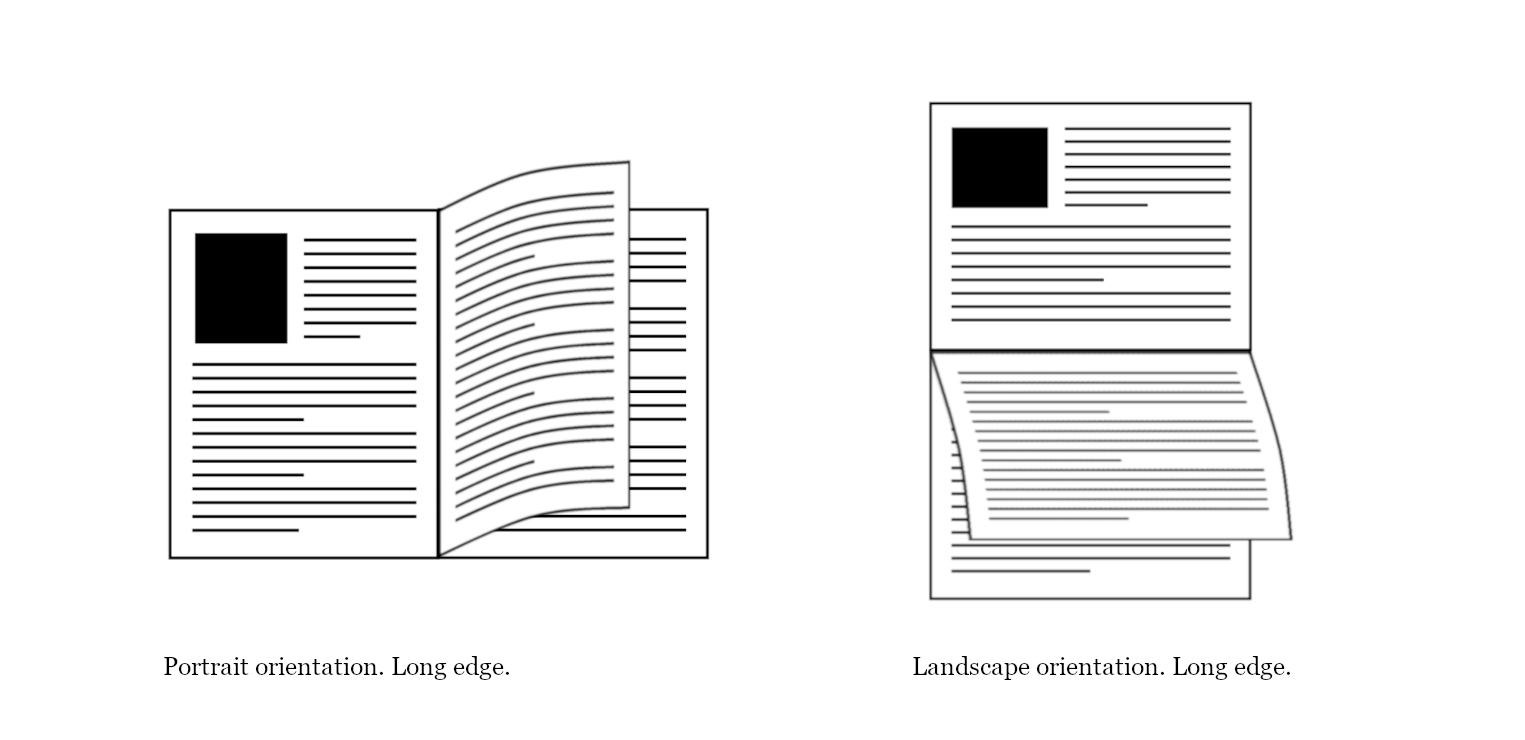
- Long side. Print documents along the long edge.
- In portrait orientation, pages will be turned side-to-side like a book. This binding method ensures continuous reading from left to right when turning the page.
- In landscape orientation, every other page will be flipped. This binding method ensures continuous reading from up to down when turning the page.
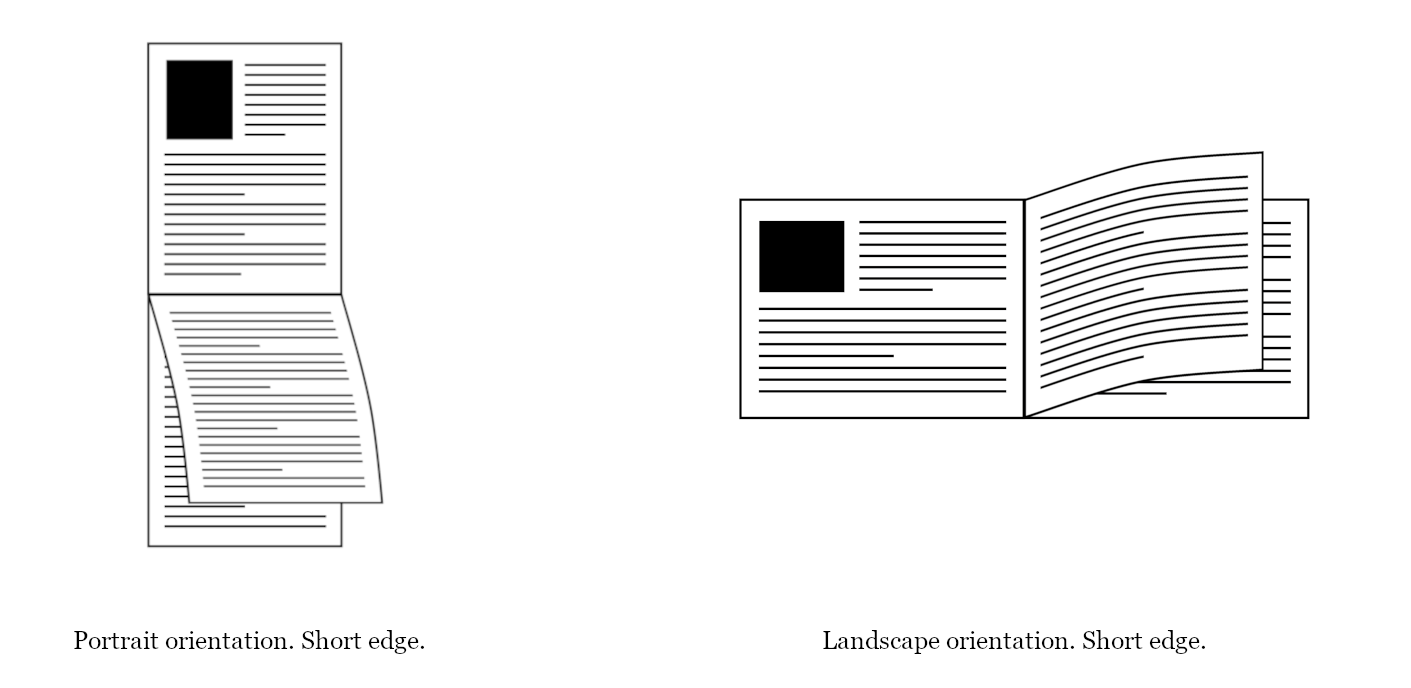
- Short side. Print documents along the short edge.
- In portrait orientation, every other page will be flipped. This binding method ensures continuous reading from up to down when turning the page.
- In landscape orientation, the pages will be turned side-to-side like a book. This binding method ensures continuous reading from left to right when turning the page.
- Manually print on both sides. Print documents on both sides manually if the printer does not support duplex printing. While printing, Master PDF Editor will prompt you to turn over the stack and load it into the printer again.
![]() Before printing the entire document on both sides manually, print a few test pages to understand which side of the paper should be loaded in the paper tray.
Before printing the entire document on both sides manually, print a few test pages to understand which side of the paper should be loaded in the paper tray.
- Orientation. Select portrait or landscape orientation.
- Page (1) of X (Current Page: Y). Select a page to preview before printing. In this case, X is the number of pages or spreads (Multiple mode) that will be printed, and Y is the number of the document page displayed in the preview, or the first page number, if there are several pages.
- Print. Print the document only or the document and annotations.
Press the Properties button to open additional settings dialog:
- System Settings. Settings dialog provided by the printer driver. Its appearance and the set of available options based on the driver.
- Page setup. Dialog to set main page parameters.
The list at the top right allows you to set the measurement units for paper size and margins: points, inches and millimeters.
- Paper Source allows selecting a specific paper source.
- The Paper section allows selecting a page size from a list of preset ones. If a specific size is selected, the width and height items will be automatically set to the corresponding values of the paper page (sheet). When selecting a Custom page size, you can enter your own size values.
- The Margins section allows setting four margins on the page (blank spaces between your data and the edges). You can select top, bottom, right and left values in the corresponding fields.
- Use the Resolution drop-down list to select the resolution in dots per inch.
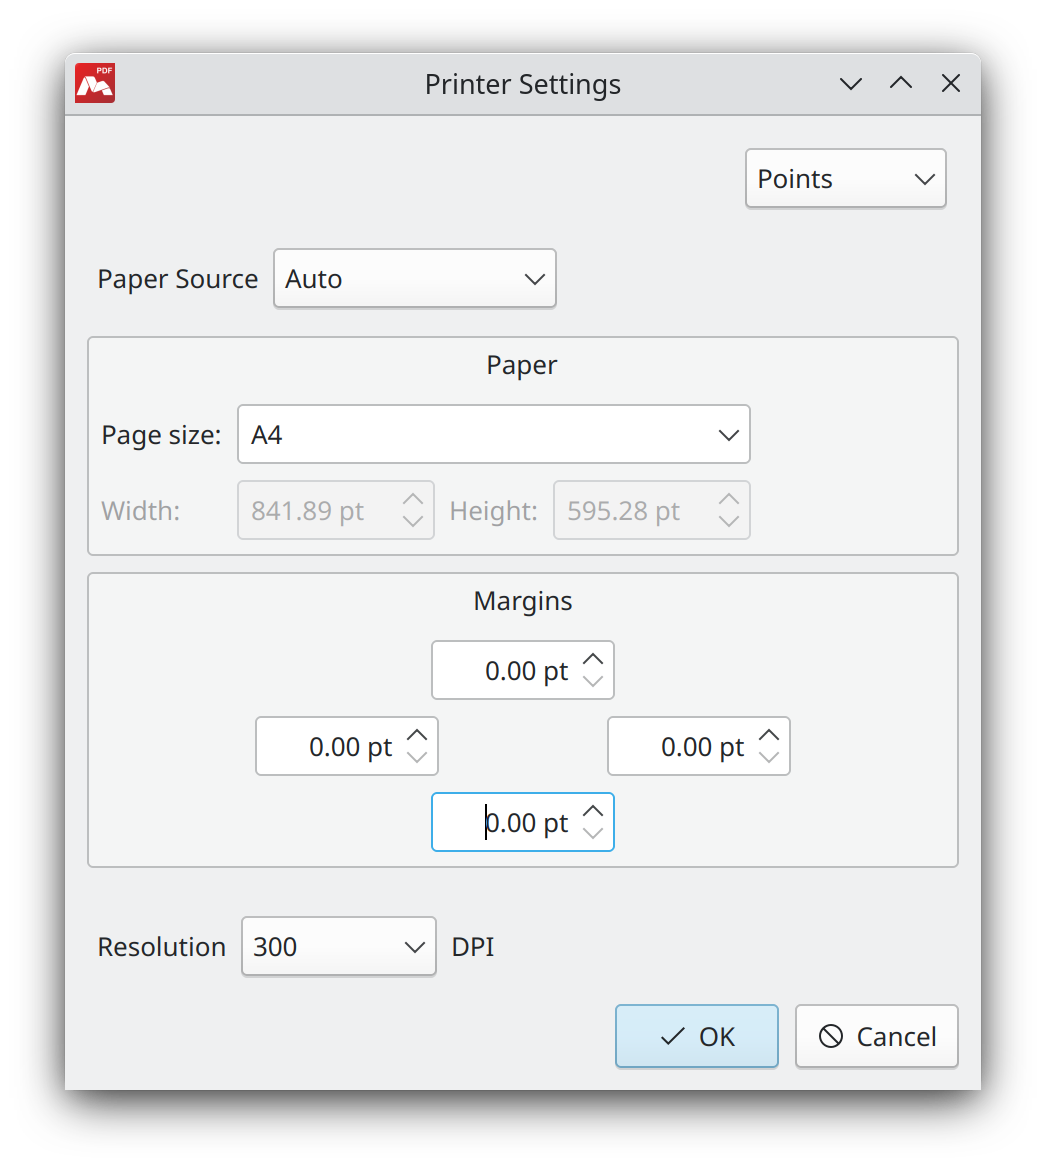
Attention! All settings available in the Printer Settings dialog (Properties > Page Setup) are provided to the user without checking whether the printer driver supports them. The actual result may differ from what is specified in this window.
Available print modes:
- Size. Normal printing mode, one page of the document is printed on one side of the paper.
- Poster. One page of a document is printed on several sheets of paper.
- Multiple. Multiple pages of a document are printed on a single sheet of paper.
- Booklet. Pages of a document are printed two pages per each side of a sheet, arranged so that they are in the correct order when folded into a booklet.
Select the print mode by clicking the corresponding button. Each mode has its own set of settings.
Size mode settings
- Aspect ratio. Apply when actual PDF page size and the print paper size are different, that is, the page may just take up a little of the printed sheet’s area or stretch over its borders. If the Actual size enabled, this option is disabled and ignored.
- Ignore aspect ratio. Stretch the page to actual print sheet size.
- Keep aspect ratio. Stretch the page to the shortest sheet side saving aspect ratio.
- Keep aspect ratio by expanding. Stretch the page to the longest sheet side saving aspect ratio.
- The Fit Page option resizes the document page to fit the paper sheet.
- Shrink to printable area reduces the document page to a printable area of the sheet.
- Enable Actual Size to print the page at its actual size.
- If you need to directly set the printed page size as a percentage of the original size, enable the Scale option.
- The printed page is centered on the sheet by selecting the Center item. When the option is disabled, the page will be printed in the sheet’s upper left corner.
Poster mode settings
- Scale. You can specify the poster size as a percentage of the original document page size. The number of sheets of paper to be used for printing is determined by the scale.
- Overlay item allows to specify how much the content of the edges of the poster segments (sheets of paper) will be overlaid. You may select points, inches or millimeters for the units the overlay is displayed in from the list below.
- To center the page on the entire paper, enable the Center item. The page will be on the top left if it is not enabled.
 Poster preview, overlay is disabled Poster preview, overlay is enabled (10 mm)
Multiple mode settings
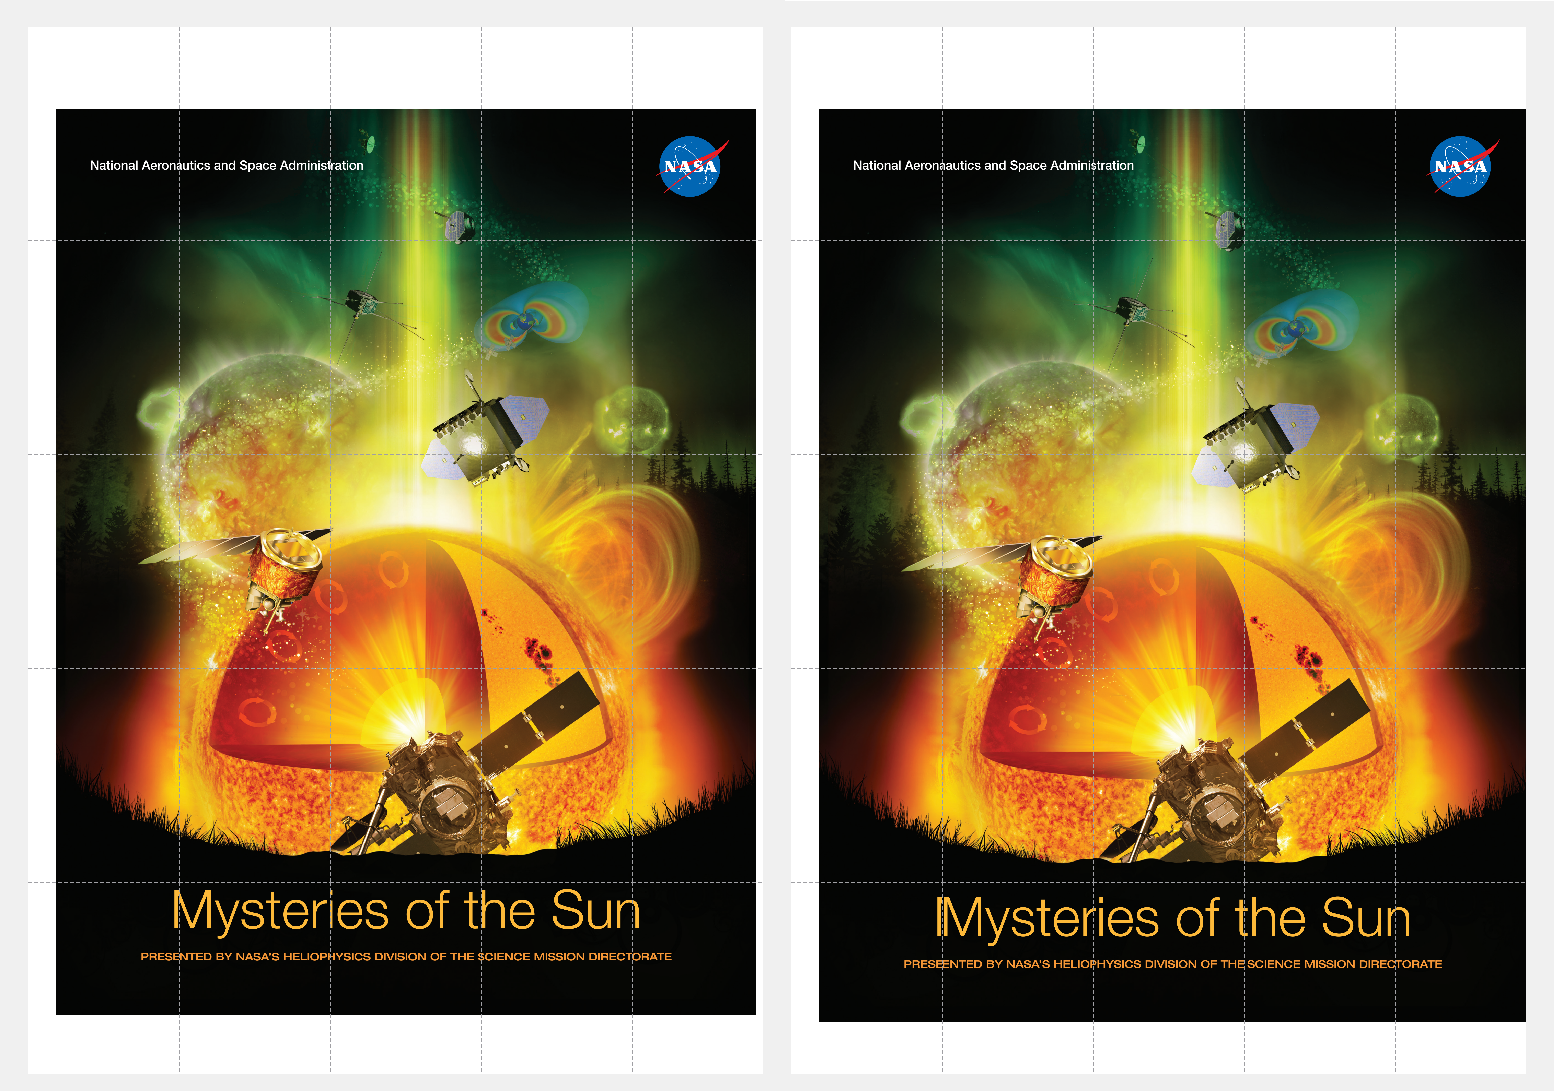
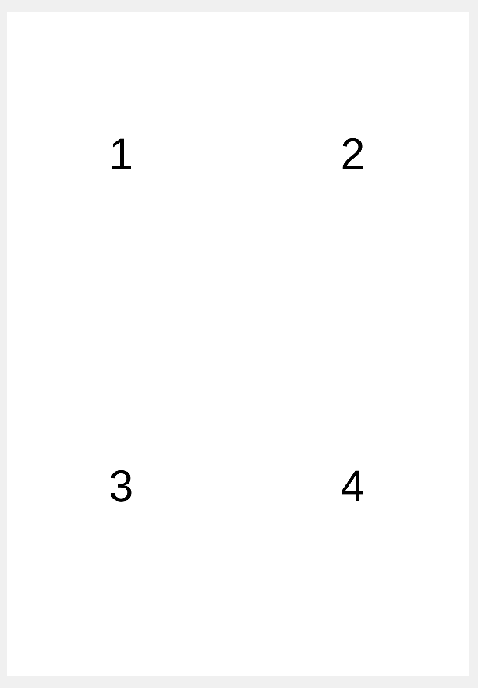
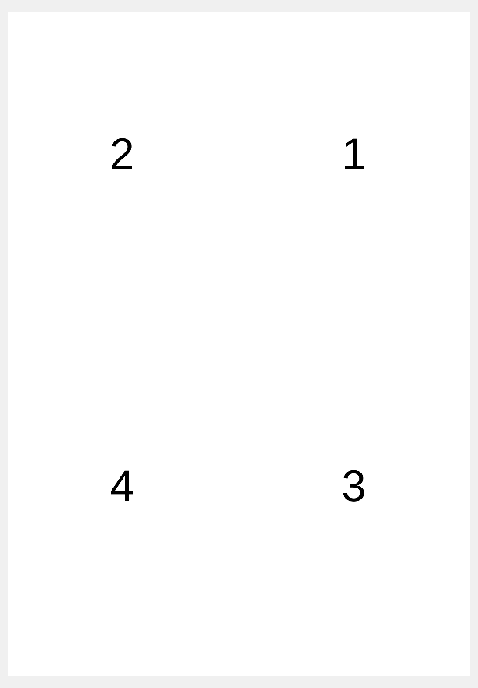
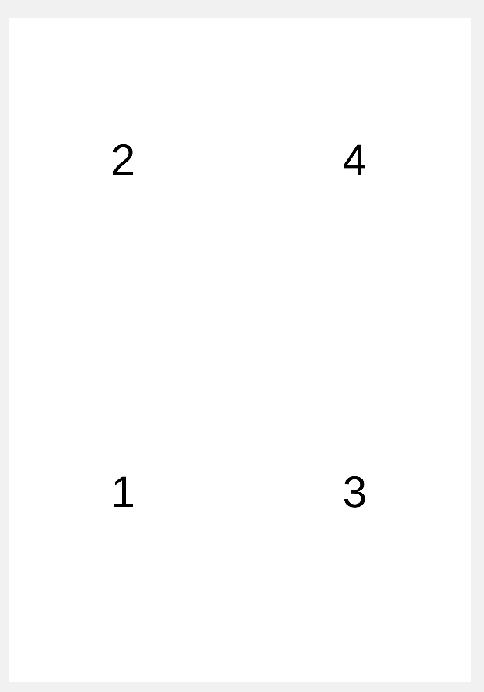
- Pages per sheet. Number of pages to be positioned both horizontally and vertically. You may select the page order from the list. In the list you can select the page order.
| Page order when using Multiple mode | |
|---|---|
| Horizontal
|
Reverse horizontal
|
| Vertical
|
Reverse vertical
|
- If Center page in cells enabled, each page will be placed in the corresponding “cell” in the center. If disabled, it will be located at the top left of its “cell” on the sheet.
- Additional spacing. Select additional space between pages on a single sheet. You can select the interval units of measurement from a list next to it, which includes points, millimeters or inches.
Booklet mode settings
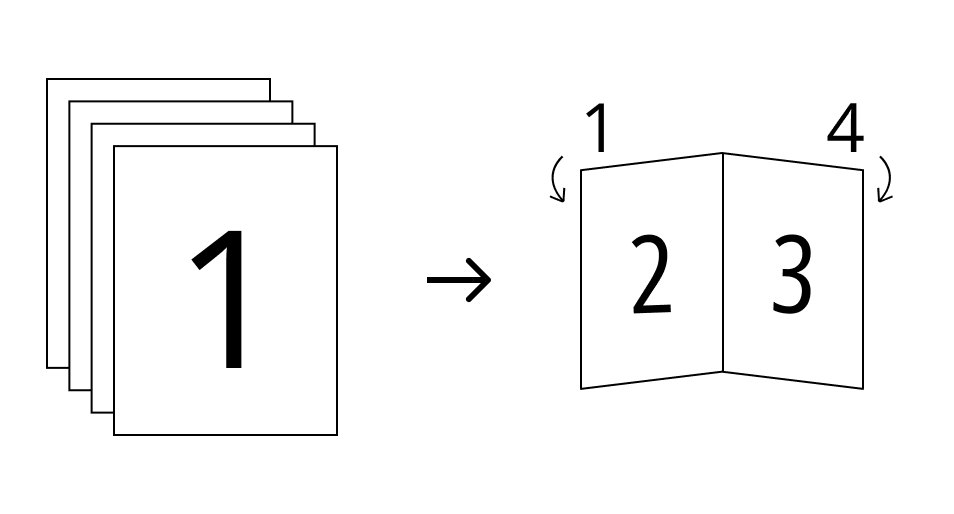
Printing a multipage document in Booklet mode.
Booklet mode allows printing a document with pages automatically arranged in the correct sequence for creating a folded booklet or book.
The following settings are available in Booklet mode:
- Center. Centers the pages on the left and right sides of the sheet. If this option is disabled, pages will be positioned at the top left of each side.
- Right Binding. Adjusts the binding direction for right-to-left reading.
- Additional spacing. Adds additional space between pages on the same sheet. You can select the spacing units such as points, millimeters, or inches from the drop-down list next to the interval.
![]() Recommendations for printing in Booklet mode:
Recommendations for printing in Booklet mode:
1. Print a few test pages before printing the entire document to ensure the layout is correct.
2. Use PDF-documents with an even number of pages for optimal result.
3. For correct page order in a printed document, paper sheets should be folded in half and inwards after printing.
As needed, select Advanced to set additional settings.
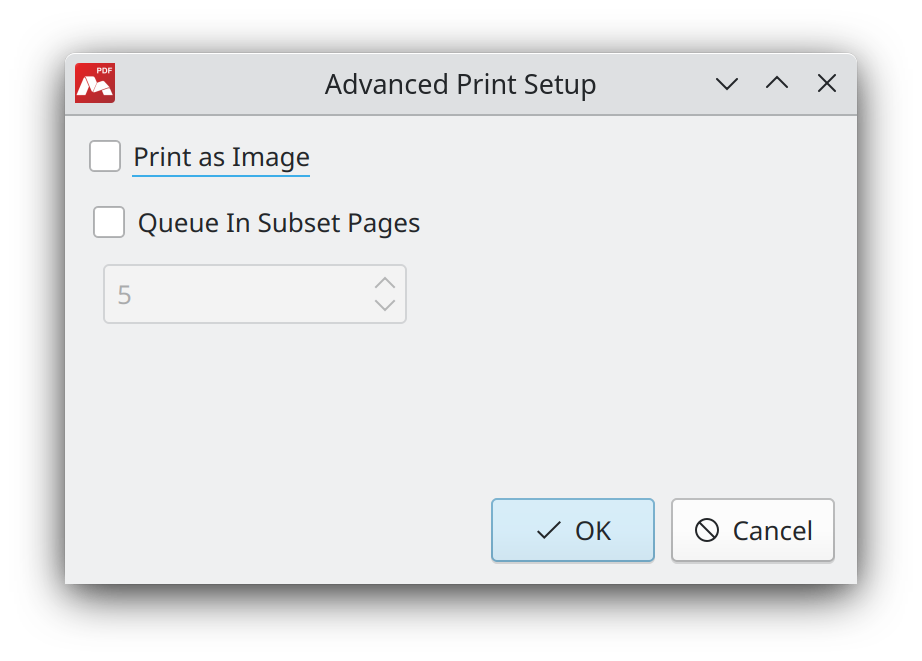
- Print as image. PDF document is provided to printer as bitmap image, so images and fonts quality can be decreased. But this can be compensated for by increasing DPI. Use this function if you are experiencing issues with normal printing.
- Queue In Subset Pages. Document is separated into multiple sup-documents according to the number of pages chosen.
More like this:
Virtual PDF Printer
Commenting PDF Files
Optimize scanned pages